Browser Extensions with Rollup - Omnibox Chatter
In the previous post, we laid down the groundwork for building a browser extension using Rollup.js that logged “Hello, World!” out to the extensions background page’s console. Today we’ll take that idea a little further and start to tie into the browser’s “Omnibox,” which will let the browser give our extension the users input into the URL bar after they’ve entered a keyword with which we’ll register in the extensions manifest.json. As part of this, we’ll set up TypeScript and a polyfill to help us out.
As a reminder of what we’re building through this series: A simple browser extension that allows for the creation of “aliases” via the URL bar, e.g., if the browser extension registers goto as the keyword, the user could set up the alias github/me to go to their GitHub profile and type in goto github/me to the URL bar to make use of the alias; Similar to Redirector.
Along the way, we’ll cover an introduction to browser extensions, talk about making them function under both Chrome and Firefox with minimal changes and how to use tools like Rollup.js to help bundle one.
While I’m writing these posts using my own preferences on techniques and technologies (which include Rollup.js as well as TypeScript, Svelte), there are a lot of alternative approaches, and it’s the concepts that are the core take away. Nothing precludes you from using different technologies; if you’d like to follow along using Vanilla ES6+ and esbuild, or any other number of setups, go right ahead! For example, I’ve been meaning to mess around with Solid.js or Rescript w/ React. Maybe even replace Rollup.js with esbuild or swc. All of which shouldn’t be too difficult to adapt this series for.
TypeScript
As I eluded to above, this step is optional. Still, I personally find that TypeScript (TS) makes it easier for me to come back to projects after a long hiatus, helps eliminate several common bug types resulting from duck typing and generally helps speed up my development. TypeScript is easy to convert to JavaScript by removing the types (the occasional enum might need some tweaks to make it an object, too, but that shouldn’t be a show stopper). Even if TypeScript is not your cup of tea, it should be easy to follow along still.
We’ll need both TypeScript as well as the Rollup TypeScript plugin:
npm add --save-dev @rollup/plugin-typescript typescript
Then we’ll need to add the plugin to our rollup.config.js, add the import somewhere near the top:
import copy from "rollup-plugin-copy"

import typescript from "@rollup/plugin-typescript"

const production = !process.env.ROLLUP_WATCH
And set up the plugin after the commonjs plugin:
resolve({ browser: true, preferBuiltins: false }),
commonjs(),

typescript({ sourceMap: !production, inlineSources: !production }),

copy({
We’re configuring the source maps to generate in development builds and telling TypeScript to inline the original TS source into the source map. I find the inlining of the source helps the browsers to be able to display the source and line/column numbering without issue. Without needing to set up a source directory mapping, something I’ve never had function well. YMMV.
Next, we’ll add the start of our tsconfig.json. You can do this in several ways, such as running npm exec tsc -- --init, but I have a starter version that I use, which closely aligns with the Svelte TSConfig (which we’ll make use of in a future post) and plays nicely with Rollup:
{
  "exclude": [
    "node_modules/*",
    "dist/*",
    "web-ext/*",
    "ext-dev/*"
  ],
  "include": [ "src/**/*.ts" ],
  "compilerOptions": {
    "strict": true,
    "target": "es2020",
    "module": "es2020",
    "moduleResolution": "node",
    "isolatedModules": true,
    "esModuleInterop": true,
    "allowSyntheticDefaultImports": true,
    "forceConsistentCasingInFileNames": true,
    "resolveJsonModule": true,
    "skipLibCheck": true
  }
}
For a reference on all the options available, please refer to the tsconfig.json docs.
We’ll need to also adjust our src/background/index.js to be a TypeScript file. Rename it to src/background/index.ts, then add export default undefined to the end. You might want to change up the console.log message as well if you’d like to see that TypeScript is working.
Why do we need export default undefined? We’ve configured TypeScript with isolatedModules turned on, which we’ll need for Svelte in future posts as the Svelte pre-processor that handles TypeScript in Svelte files only works on a file-by-file basis and, as the isolatedModules docs say:
[…] other transpilers only operate on a single file at a time, which means they can’t apply code transforms that depend on understanding the full type system.
Without this, you might see this warning pop up in the Rollup output:
rollup v2.52.7
bundles src/background/index.ts → dist/background...
(!) Plugin typescript: @rollup/plugin-typescript TS1208: 'index.ts' cannot be compiled under '--isolatedModules' because it is considered a global script file. Add an import, export, or an empty 'export {}' statement to make it a module.
src/background/index.ts: (1:1)

1 console.log("Hello, World! From TS!")
  ~~~~~~~

created dist/background in 1s

[2021-10-23 20:12:54] waiting for changes...
One last change that we need to make is to change the extension in the input for the background page’s entry point to .ts so that Rollup can find the file correctly:
export default [
  {
    input: "src/background/index.ts",
    output: {
      sourcemap: !production,
      dir: "dist/background/",
      format: "esm",
    },
Now npm run start:rollup should run without issue, and reloading the extension
In Firefox, the debugging page that we used to load the extension in the previous post, about:debugging#/runtime/this-firefox, will display a small “Reload” button on the bottom right corner of the extensions card: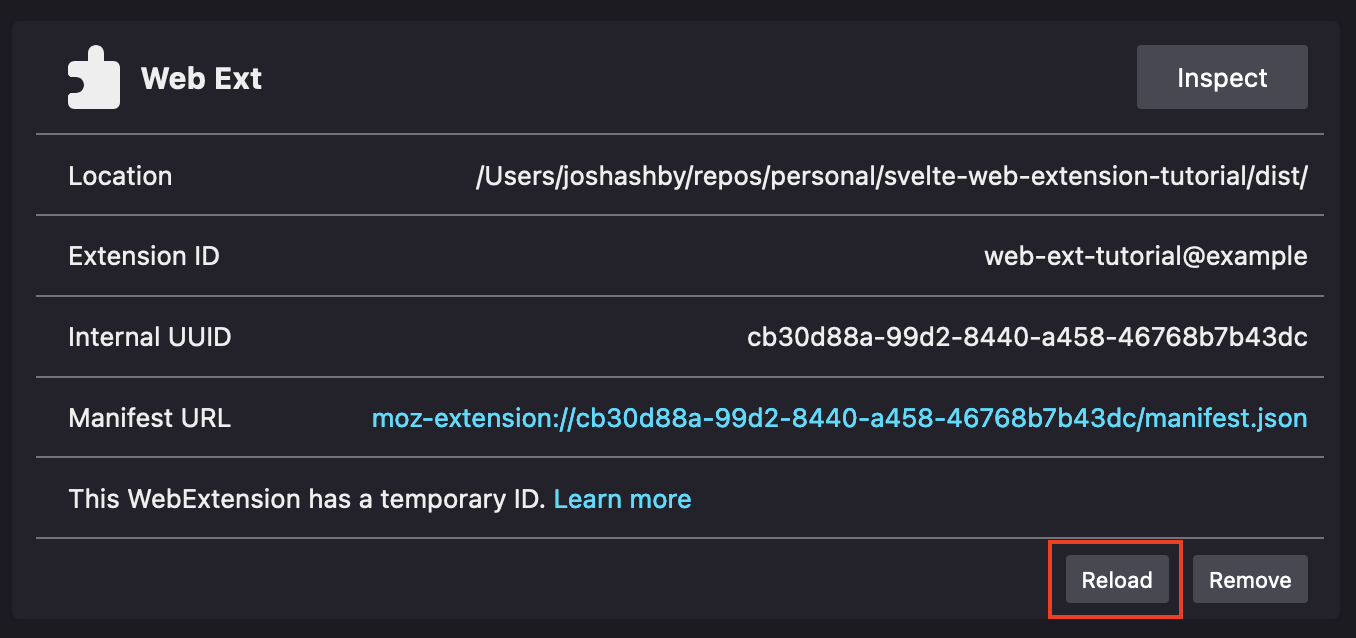 For Chrome, the extensions page that we used to load the unpacked extension,
 chrome://extensions/, will display a small “Reload” icon button on the bottom right corner of the extensions card: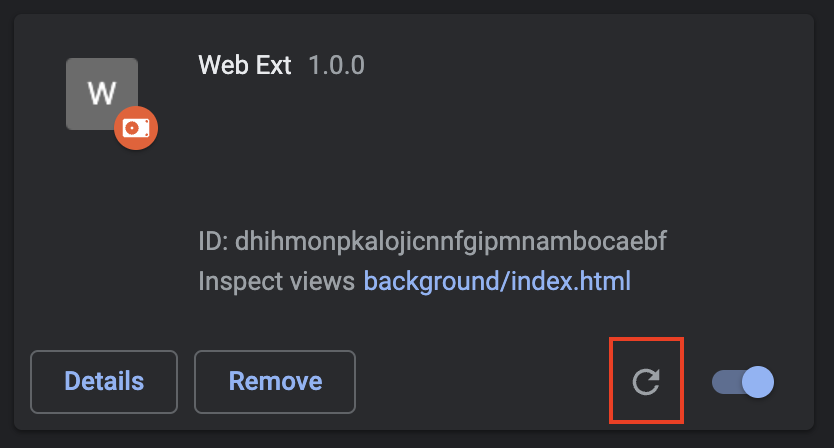 in your browser should cause your
 console.log message to show up as before:
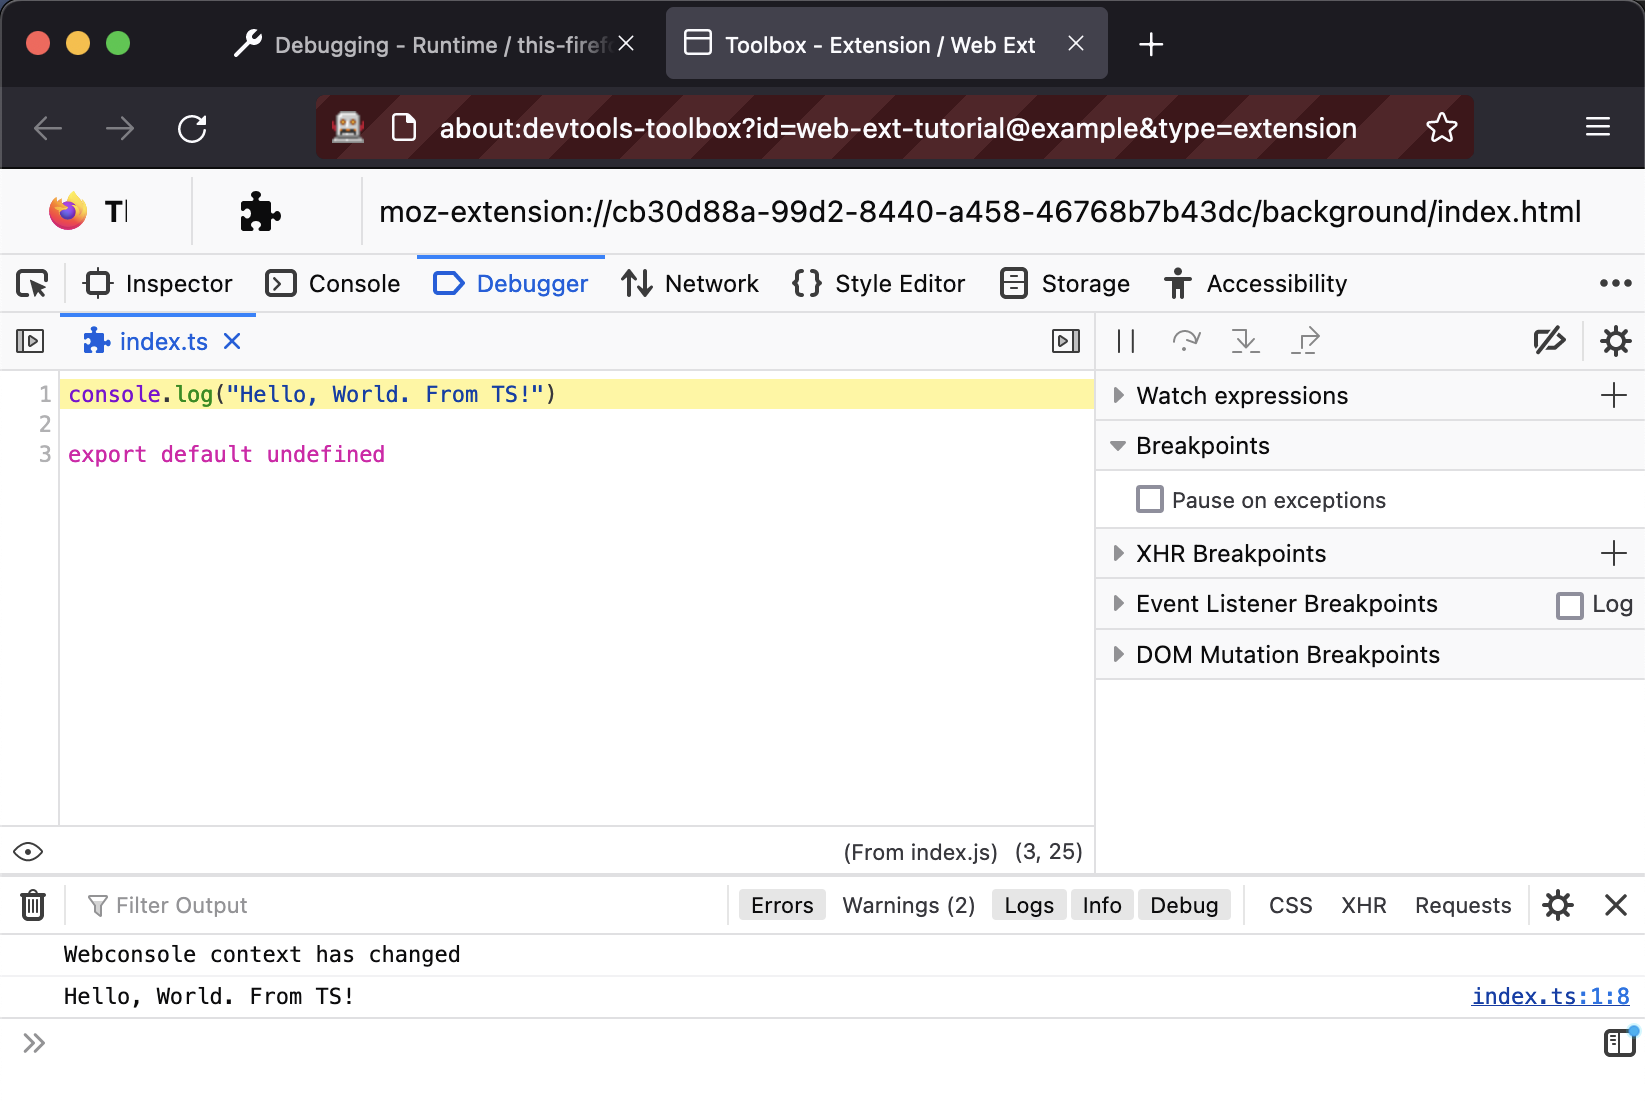
Not only that, the browser should correctly show the original filename, index.ts and even the original TS file’s source!
Polyfills
Before we get any further, we’re going to add a polyfill for the browser extensions API that Mozilla provides, allowing us to use the browser promise-based APIs, even while running the browser extension in Chrome.
Why do we need such a thing, you might ask? Great question! As it turns out, Chrome’s browser extension API is an older generation
The OG, in fact!
and makes use of a chrome namespace (ie: chrome.storage.sync) which uses callbacks for async operations.
Record Scratch Yes, I did just say “callbacks for async operations.” Yes, we’re in a post ES6 world where JavaScript has promises and async/await keywords for working with them in a friendly, synchronous like fashion that solves a significant amount of the problems that lead to, and result from, Callback Hell.
On the other hand, Firefox ships with a more modern
And maybe soon standards track
, generation of the original Chrome API. This version lives under the browser namespace and uses promises for async operations. Thankfully, the fine folks at Mozilla maintain a polyfill for Chrome which allows you to use the browser and promise-based API’s so we can write modern code once that runs on both browsers.
Add it to our dependencies with npm add like always (I’m not saving it under the dev dependencies this time, as it’s a required runtime module that we’ll actively import into our code):
npm add webextension-polyfill
To test it out, we’ll make use of the browser.runtime.id call in our console.log, which should print out a nice random string that represents the ID of the extension.
This is customizable in Firefox, via the browser_specific_settings.gecko.id property of the manifest, the docs for which are found here.
Update src/background/index.ts file to look like the following:
import browser from "webextension-polyfill"

console.log(`Hello, World! From TS! ${browser.runtime.id}`)
The Trouble with Tribbles Types
If you’re using TypeScript, you might notice this fun warning show up in the Rollup output, and you might have an error in your editor for the same issue:
(!) Plugin typescript: @rollup/plugin-typescript TS7016: Could not find a declaration file for module 'webextension-polyfill'. '/Users/joshashby/repos/personal/svelte-web-extension-tutorial/node_modules/webextension-polyfill/dist/browser-polyfill.js' implicitly has an 'any' type.
  Try `npm i --save-dev @types/webextension-polyfill` if it exists or add a new declaration (.d.ts) file containing `declare module 'webextension-polyfill';`
This is where I found things get a little hairy right now. There are a couple of packges that supply types for the browser API’s and for the polyfill
@types/webextension-polyfill Sounds great at first, but I’ve found it has some missing or oddly typed APIs and many instances of various objects being a nebulous any, which isn’t super helpful for a well-defined set of APIs like this.
, however the most complete and up-to-date one that I use is @types/firefox-webext-browser:
npm add --save-dev @types/firefox-webext-browser
Unfortunately, installing this package doesn’t get you very far. The import error for webextension-polyfill will remain, as this package only declares types for a global browser object. This also has the downside of TypeScript thinking browser is defined, regardless of if you’ve remembered to import webextension-polyfill or not. So how do we get around this?
Well … We hack it. This is the real ugly bit and abuses TypeScript a bit, but we’re going to make an ambient definition, by creating a src/polyfill-types.d.ts file with the following contents:
import type browser from "@types/firefox-webext-browser"

declare module "webextension-polyfill" {
  export default browser
}
We use an ambient .d.ts file since TypeScript will pick it up without any additional work from us, and we define the default export of the polyfill as being typed by the type export of the @types/firefox-webext-browser package.
With this out of the way, the TypeScript warning should resolve, and reloading the extension should yield our new console.log message:
Hello, World! From TS! e7f1b7ad5057a435952272be6270dbf6b16867fe@temporary-addon
So, What’s the Omnibox?
Now that we have our polyfill in place (and some of you have TypeScript up and running), we can get on with our original goal for today: Integrating with the Omnibox (The Omnibox might be more recognizable to you as the URL bar) and browser extensions are allowed to register a keyword with the browser, which, when typed into the Omnibox, will cause the browser to begin sending the contents of the Omnibox to your extension.
To get started, we’ll follow the directions of the Omnibox docs and add an omnibox section to our manifest.json, where we’ll also define our keyword.
I chose vrm, short for vroom, but this can be just about any word
  "background": {
    "page": "background/index.html"
  },
  "omnibox": {
    "keyword": "vrm"
  }
}
With this in place, we can now start hooking up to the omnibox API. We’ll use the extension’s background page to register event listeners and handle the subsequent events since the background page will run at all times and has the highest level of permissions for accessing parts of the browser extension API.
This API is event-driven
The browser extension APIs where an extension might react to something happening in the browser are all exposed as events, using the same interface consisting of the functions addEventListener, hasEventListener/hasEventListeners and removeEventListener, which all take a callback function which is the event subscriber.
, and in particular, for the omnibox, there are 4 events we can listen for:
onInputStartedCalled with no arguments when the user has typed in the full keyword followed by a spaceonInputChangedCalled with the current input and a callback that allows setting suggestionsonInputEnteredCalled when the user accepts one of the suggestionsonInputCancelledCalled when the user escapes/closes the omnibox
We’ll only use onInputChanged and onInputEntered for our extension, but to demonstrate the others and get a sense of how this API works, we’ll add some basic logging. Add the following to the end of src/background/index.ts:
browser.omnibox.onInputStarted.addListener(() => {
  console.log("Input started")
})

browser.omnibox.onInputChanged.addListener((input, suggest) => {
  console.log(`Input changed! ${input}`)

  suggest([
    { content: "s1", description: "This is suggestion 1" },
    { content: "s2", description: "This is suggestion 2" },
    { content: "s3", description: "This is suggestion 3" },
    { content: "s4", description: "This is suggestion 4" },
  ])
})

browser.omnibox.onInputEntered.addListener((suggestion, disposition) => {
  console.log(`Input entered! ${suggestion} should open in ${disposition}`)
})

browser.omnibox.onInputCancelled.addListener(() => {
  console.log("Input cancelled")
})
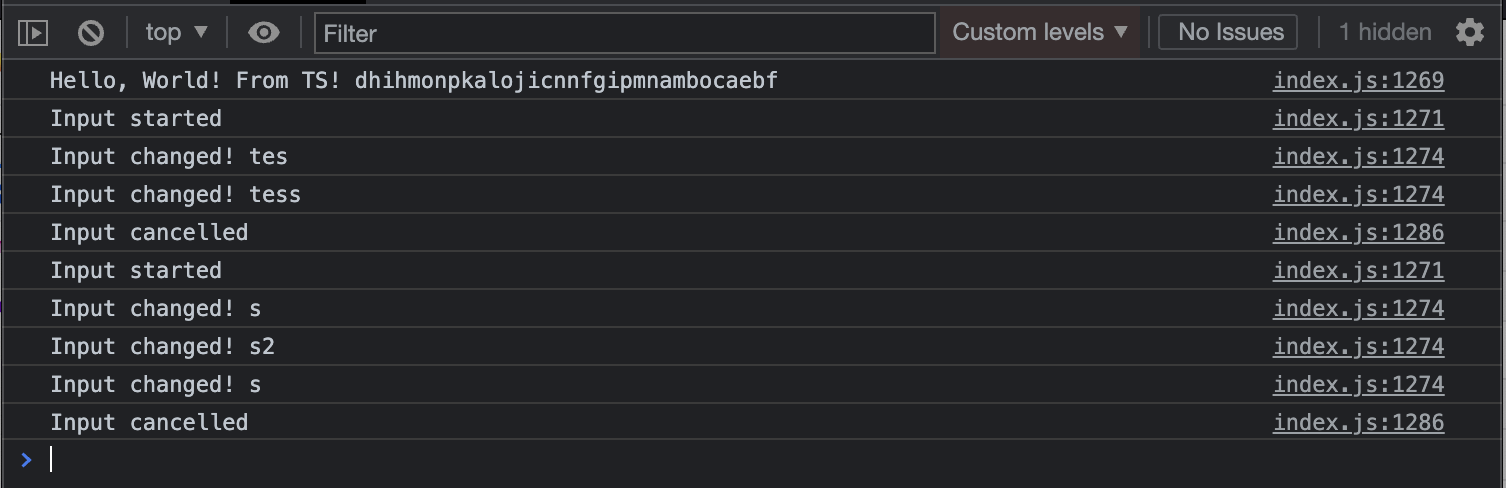
After reloading the extension, by typing in your keyword to the URL bar, you should trigger the logging statements and see the suggestions we put in place.
Firefox


Chrome

The heart of what we’ll be expanding upon in future posts of this series is this little bit with suggest here:
browser.omnibox.onInputChanged.addListener((text, suggest) => {
  console.log(`Input changed! ${text}`)

  suggest([
    { content: "s1", description: "This is suggestion 1" },
    { content: "s2", description: "This is suggestion 2" },
    { content: "s3", description: "This is suggestion 3" },
    { content: "s4", description: "This is suggestion 4" },
  ])
})
Listeners for onInputChanged receive two arguments, text and suggest. text is the full text, minus the keyword and space, that the user has typed, while suggest is a callback that accepts an array of SuggestResult. A SuggestResult is just an object with two properties, content and description. description is, understandably, only for the users, however content represents the actual “value” of the suggestion, and if the user were to accept that suggestion, content is what the extension will receive in it’s onInputEntered listener.
In the future, we’ll use this bit of knowledge to build out our alias functionality, displaying matching aliases and the URL that they map to as the description.
Wrapping Up
We laid down some good foundations for building our extension, but it still doesn’t do much; Currently, it registers a keyword with the browser for the Omnibox and prints out the events to the console. In the next post, we’ll finish the last bit of setup for a while: installing and configuring Svelte, and then use it to make a basic settings page. After that, we’ll be able to start interacting with the browser extension storage APIs to read/write our aliases. Finally, we’ll be able to hook up our work here with the omnibox API to our new settings to be able to suggest, and act upon, those aliases!