kilo
from the ground up, and have made it
about halfway through “Chapter 4” which is the first chapter to really pick up
the pace with the “text editor” bits. Up to this point (Chapters 1-3), we’ve
been concerned with laying down the groundwork for building a UI using VT100
commands and doing tasks like moving the cursor around the screen and handling
interacting with the terminal device in a clean fashion. Chapter 4 concerns
itself with making a text viewer and really brings out the quirks in human
language as we start to dive into handling displaying text and moving a cursor
around it in a meaningful way.
At this point I’ve already implemented a few features that take a departure
from the standard kilo
, as well as having a fairly different take on the code
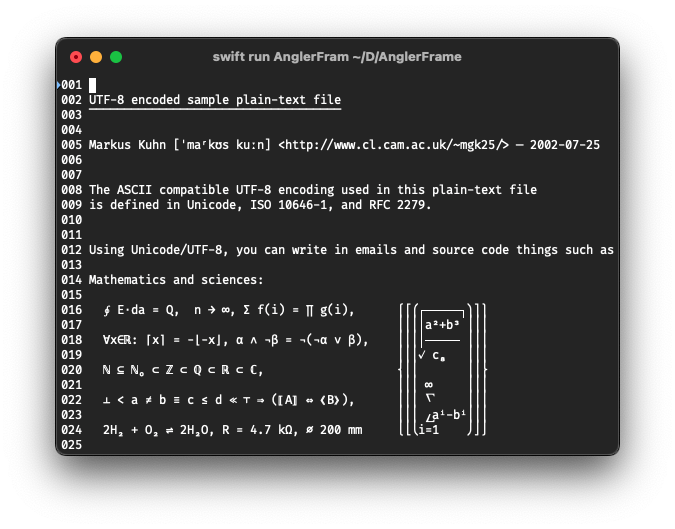
layout. I’ve gotten UTF-8 displaying without issue thanks to Swift (although
I’m sure I’ve got a few length bugs and other issues that’ll surface as I work
on “Chapter 5” which implements text-editing) and I’ve made the cursor behave
more similar to Vim (more on this below) and I’ve got line numbers in a
“gutter.”
In terms of code changes, I’ve made use of structs and classes in Swift to
organize and further abstract some of the code away. At the moment, I’ve got an
Editor
class which is the heart of the system, integrating with a Display
object which concerns itself with outputting things, and an Input
object
which concerns itself with converting raw input from FileHandle.read(_:)
into
a nicer enum. This should make it a little nicer to work on future expansions,
such as: convert the Input
code into an async system, where it’d write into a
buffer that can be read from the main thread. It also feels a lot more “Swifty”
to me and gets around some of the ugliness of C and its lack of name spacing
and methods.
The situation: You’re moving vertically from a longer line to a shorter line, and the cursor is positioned in a column past the end of the shorter lines length.
Take, for example, the following lines:
What happens to the cursor if you have it at column 4 on line 1, and move it to line 2? What happens when it moves from line 2 to line 3 after this?
In the original kilo
, the cursor sets its position to the shorter lines
length, effectively snapping it to a new position. In the above example, this
moves the cursor from column 4 to column 2, and when you subsequently move from
line 2 to line 3, the cursor remains in the new position of column 2. This is a
little annoying because if you are trying to compare column positions and
encounter a blank line, the cursor loses all context of where it originally
was!
In Vim, however, the cursor is displayed as snapping to the end of the shorter line but it retains its original column position when navigating. This means that in our example above, the cursor appears to snap back to column 2 on line 2, but will return to column 4 on line 3, keeping continuity a little better. When you insert text where the cursor is displayed at a different column from its remembered position, it resets to the currently displayed position. So if you move from column 4 on line 1 to line 2 and then insert a character, the new cursor’s position will be column 3 after the insert, because it reset to column 2 on the insert and then moved over one column for the inserted character.
I’ve copied this behavior from Vim as I find it a lot more intuitive to how the cursor should move around text and even make use of the feature to find in correct indents, for example. It turned out to be fairly easy, using Swift’s computed properties:
// The Cursor is in "file space," not "screen space" which means that it
// actually represents where at in the file the cursor is, and requires
// translation via adding the scrollOffsets and any gutters/UI paddings
// before it can be displayed correctly.
var cursor: (col: Int, row: Int) = (0, 0)
// It's possible that the current row is shorter than the row we just came
// from, and that our cursor might be in the middle of nowhere. To match
// Vim's behavior where it'll keep the original column as you move around,
// visually snapping the cursor to the end of the line, we use this second
// "displayedCursor" which snaps the cursor but doesn't change the cursors
// original column. If you then insert while on a column that is different
// from the current cursor, we'll update the cursor to the current column.
var displayedCursor: (col: Int, row: Int) {
guard let currentRow
else { return cursor }
let minCol = min(currentRow.count, cursor.col)
return (minCol, cursor.row)
}
Now, when moving the cursor with the escape sequence: ^[<row>;<col>H
, I just
have to pass in the displayedCursor
values instead to get this visual
snapping while remembering the original column. And when navigating left/right,
and when I get to inserting text in the next chapter, I just have a small check
to reset the cursor’s real position to the displayed position if the two don’t
match.
One of the big “pain points” that I’ve hit so far is dealing with differences
in string handling. In kilo
, both because it’s concerned with just ASCII text
where a character fits into a single byte, and because C-strings are just
simple arrays, it gets away with using direct indexing into the string and
directly manipulating a length integer when it needs a slice. This plays nicely
with tracking the column width and scroll offsets in integers as well, since
you can start indexing from the scroll offset directly, up to the column width
or string length.
So, for example, to pick out the text that is visible during a horizontal scroll,
kilo
does something similar to:
int len = E.row[filerow].rsize - E.coloff;
if (len < 0) len = 0;
if (len > E.screencols) len = E.screencols;
abAppend(ab, &E.row[filerow].render[E.coloff], len);
Where E.coloff
is the horizontal scroll offset, E.screencols
is the screens
width in columns, with E.row[filerow].render
being the character array/string
for a single line and finally rsize
being the number of characters in the
current line.
This code is fairly short and succinct but it doesn’t translate one-to-one in Swift. One initial thought, you might think we could write something similar to:
var len = max(0, editor.rows[filerow].count)
len = min(len, editor.screenSize.cols)
display.buffer(string: editor.rows[filerow][editior.scrollOffset.col..<len])
But we quickly run into an error:
error: 'subscript(_:)' is unavailable: cannot subscript String with an integer range, use a String.Index range instead.
Swift explicitly tells us that it needs us to use String.Index
instead of
integers, but why?. A big reason is because internally Swift represents strings
differently from C, allowing it to better handle things like Unicode. In
Unicode, such as the UTF-8 version, a single character visually might be
composed of a number of bytes (a “grapheme cluster”) rather than just one. By
using String.Index
, Swift can correctly calculate things like “the next
character” without cutting a grapheme cluster in half. So how do we use it?
Well, thankfully Swift gives us a few helpers, such as the String.startIndex
and
String.endIndex
properties as well as String.index(_:offsetBy:)
. Using
these, we can slice our line in the same fashion that kilo
does, all while
being (more) aware of UTF-8 and friends:
let row = rows[fileRow]
let startOffset = scrollOffset.col
let endOffset = lineLength + scrollOffset.col
if let startIndex = row.index(row.startIndex, offsetBy: startOffset, limitedBy: row.endIndex) {
let endIndex = row.index(startIndex, offsetBy: endOffset, limitedBy: row.endIndex) ?? row.endIndex
let displayedRow = row[startIndex..<endIndex]
display.buffer(string: String(displayedRow))
}
Here, we can calculate the offsets the same way, just using some simple integer
math, but we have to convert them into indexes. We also use limitedBy:
to
ensure that we’re not going to throw an out-of-bounds error if we’re trying to
access an offset that is bigger than the current lines length. This approach
also forces us to consider common failure cases such as a line that is shorter
than the screen, or a line that has been completely scrolled off the screen.
Every time I run into this, it feels a bit frustrating to write at the time. It’s something that feels like a case that the language should smooth over for the developer and it’s a lot more verbose than the same code in a lot of other languages. However, it’s not all bad: the design of this system forces the developer to move past the outdated fashion of thinking of text as a simple array of bytes and towards the thought that it’s a more complex system that handles a number of quirks and oddities that come from the complexities of human writing.
Anyways, hopefully this has been a fun little adventure into two of the many little adventures I’ve had while working on this fun side project!
]]>I’ll skip over what Typst is, since hopefully one of the above folk covers it, but I do want to share how I made my life a little easier by combining Typst and Jekyll.
In addition to a PDF version, I’ve traditionally kept a version of my resume on this site as a regular webpage, making it easy to point to in a pinch. One of the biggest pains that I’ve had in the past has been keeping that old Pages based resume and the “resume” page on this website up to date, and more importantly, synced up. It involved a lot of copy-and-paste, formatting (and more reformatting), and was generally just a bummer and a time sink.
Lately, I’ve been trying to make better use of Jekyll’s data files support and thought to myself, “resumes are generally pretty well structured … gee it’d be nice to put my resume data into a file that Jekyll AND LaTeX can render versions of!”
(Spoilers: Lo and behold, Xe already did it!)
The big problem with that thought (besides the whole YAML bit) was that I’m not a fan of LaTeX, mostly because I haven’t bothered to learn how to use it properly.
That’s where the LaTeX ~killer~ alternative and hero of our story, Typst, comes in. I found Typst almost too easy to get started with and pretty quickly had the best-looking version of my resume that I’ve ever had. However, even though the formatting was a lot easier since markdown and Typst have a lot of overlap, I was still copying content in.
“Let’s fix that,” I thought.
A cool thing about Typst is that it can load a variety of data files, for example YAML:
let data = yaml("/_data/stuff.yml")
That’s neat!
Additionally, I can throw that YAML file into my sites _data/
directory, so that Jekyll will automatically read it into a site.data.stuff
variable that I can interact with in a template.
From here it was pretty easy to pull out all of the data from my resume into this YAML file, and my Typst code became a series of for loops and templating out data which quickly translated into similar Jekyll Liquid template code.
The end result is three files (plus some supporting font and icon files for the Typst template):
Lastly, I wanted the GitHub Actions Workflow which builds and publishes this site to also keep the Typst generated PDF version up to date. This worked out to be a pretty easy addition, as the command to render the PDF is fairly simple and easily added to the workflow so long as Typst is installed:
typst compile --root=./ --font-path=assets/fonts/ resume/_resume2023.typ resume.pdf
I used the pleasant typst-community/setup-typst@v3 action to get Typst into the environment and then set up the build step to render the PDF version before Jekyll runs:
- uses: typst-community/setup-typst@v3
id: setup-typst
with:
typst-version: 'v0.10.0'
- name: Build resume PDF with Typst
working-directory: source
run: typst compile --root=./ --font-path=assets/fonts/ resume/_resume2023.typ resume.pdf
- name: Jekyll Build
working-directory: source
env:
JEKYLL_ENV: production
run: bundle exec jekyll build -d ../build
(You can see the full workflow file here.)
Now keeping both my site and the nicer PDF version up to date is a breeze, and with the formatting decoupled from the presentation in both versions, it’s equally as easy to adjust styling and layout without feeling like I’m starting over with all of the content!
Overall I’d give Typst a 9/10 and would recommend folks check it out if you find yourself writing LaTeX or making documents that render to PDFs often and have the option to look into other tools. It’d be a 10/10 if the error messages were a little better but it’s still improving and is already a fantastic tool.
]]>The elves, with us in tow, have come across a fantastic grove of trees and for whatever reason they think it’s a great place (and time to build a tree house). They’ve mapped out the tree heights and want to find the best point that’s hidden from the outside but still has a great view.
Today’s solution isn’t going to be the most efficient but I still had fun solving it and further cleaning up my solutions from the mess I made racing the clock. I’ve also grown more comfortable with the basics of the language, enough so that I feel that I can start stepping out and exploring more of the features available with firmer footing under me.
As we’ve already seen, AoC has a number of different input formats and today’s is no different. We’ve got a 2-d array represented in text as a column per character and a row per line, each element is an integer within the range of 0-9. Compared to some other days, this is fairly trivial and a good format to get comfortable with as it’ll surely appear again in the future of either this year or the next.
If you recall, on day 1 we made heavy use of split(separator:)
to break apart lines and on day 6 we used Array(_: String)
to convert a string to an array where each element is a character in the string. There’s a further trick to reduce our work which is that Strings implement iterators that return a String.Element
, aka a Character
, each time, meaning we can directly call map(_:)
on strings, neat! We can tie these together along with Int(_: String) -> Int?
to parse our input into a 2-d array that’s ready to go with minimal work, but we’ve got some snag. Firing up a REPL (swift repl
) we see that there isn’t an Int(_: Character)
initializer!
1> Int(Character("1"))
# whole bunch of messages like this:
Swift.FixedWidthInteger:3:23: note: candidate expects value of type 'String' for parameter #1 (got 'Character')
Well, that’s inconvenient. We could convert the Character to a String and then initialize an Int but that’s just straight up messy. Looking through the docs for Character
however we see that there’s a helpful wholeNumberValue
property, perfect.
typealias TreeHeight = Int
typealias TreeGridRow = [TreeHeight]
typealias TreeHeightGrid = [GridRow]
let trees: TreeHeightGrid = input.split(separator: "\n").map { line in
line.map { char in char.wholeNumberValue! }
}
We’re okay with failing if the character doesn’t parse into an integer since that means our input is malformed and we don’t want to continue, so we’ll take the easy route of force-unwrapping it. Ideally we’d probably want to make a nice error message, however, to help reduce the time taken to track down where failures are.
To make our code a little more expressive, we also define a few typealiases
to make it clear that trees
is a 2-d array of our tree heights. This is a little contrived but it’s something that really helps me remember what a specific data structure is storing, beyond the plain [[Int]]
.
Since we’re (or at least I am) getting more comfortable with the language, let’s try golfing this a tiny bit for fun and learn what we can!
I’ve glossed over these in previous days but Swift has implicitly args for its closures, called Shorthand Argument Names which means that our line.map(_:)
can turn into:
let trees: TreeGrid = input.split(separator: "\n").map { line in
line.map { $0.wholeNumberValue! }
}
In this case though, it’s not too clear what $0
is immediately as we’re in a closure … wrapped in a closure. Not really ideal there, is it? I’m always on the fence about how much I like using shorthands in any language, since it does make the code a little harder to reason about so let’s keep digging.
As it turns out, we can get this even smaller. Swift also has Key-Path Expressions which allow us to reference a property or subscript on a value using a \.<name>
pattern. In this case, swift knows that our map(_:)
is getting called on a Character
type so we can reference the Character
’s wholeNumberValue
property via \.wholeNumberValue
. This will still return an optional, though, but thankfully the key-path support optional and force-unwrapping so our final parsing code can become:
let trees: TreeGrid = input.split(separator: "\n").map { $0.map(\.wholeNumberValue!) }
There are certainly more ways to golf this down further but I find this to be a good balance of extracting the data and being clean and seems like it’ll fit well with a lot of the AoC parsing problems if I go back and clean up old code!
Consider your map; how many trees are visible from outside the grid?
So we’ve got our tree height map all parsed out into a fancy 2-d array and now we’ve got to find which trees the elves shouldn’t build in, because those trees are visible from outside the grove. We’ve got a couple of options here for how we go about checking if a tree is visible or hidden but we’ll do the easy route and just check each tree individually. To do this we need to:
We’ll need a few things to make this easier to work with, firstly a typealias for coordinates which we’ll store as a named-element tuple:
typealias Coords = (x: Int, y: Int)
And next up a struct container for some helpful functions for interacting with our map:
struct HeightMap {
let grid: TreeHeightGrid
let xBounds: Range<Int>
let yBounds: Range<Int>
init(_ grid: TreeHeightGrid) {
self.grid = grid
self.xBounds = 0..<grid.first!.count
self.yBounds = 0..<grid.count
}
func contains(_ coords: Coords) -> Bool { xBounds ~= coords.x && yBounds ~= coords.y }
func heightAt(_ coords: Coords) -> TreeHeight {
if !contains(coords) {
fatalError("Coords \(coords) are not within the maps coordinate space!")
}
return grid[coords.y][coords.x]
}
}
There’s a bit to break down here, we’re storing some bounds, and have a few helpers including one that gets the height of a tree if we have a set of coordinates.
When we initialize a new HeightMap
, we’re also building two ranges which represent the bounds of our map. Using ranges here gets us two nice-to-haves: it’s easy to check if a coordinate calls within the map, and we can iterate over them to build lists of coordinates that are all within the map automatically. We’ll see this more in a minute.
Now, Ashby there’s a typo in contains(_:)
, you might say. What’s this ~=
business? It’s actually a shortcut operator for contains(_:)
that’s defined on Range
! It’s not the most expressive but it does allow us to neatly condense our contains check for both dimensions into one line.
Finally, we’ve got a helper that does a bounds check before returning the height of the tree at a given set of coordinates. We’d probably want to make this a func heightAt(_ coords: Coords) throws -> TreeHeight
and have a specific OutOfBounds
error rather than just fatally erroring out and exiting if this was production code, but we shouldn’t hit any failures during our normal puzzle operations so it’s more of a ‘we did our math wrong’ debugging helper.
We know that we’re going to need a list of coordinates for all of the trees, so how can we programmatically build that? We’ll use our ranges from the bounds! Because I want to also cut down on how many trees we have to iterate through, we’ll actually make an interiorCoordinates
property on our HeightMap
struct:
var interiorCoords: [Coords] {
yBounds.dropFirst().dropLast().flatMap { y in
xBounds.dropFirst().dropLast().map { x in (x, y) }
}
}
The .dropFirst().dropLast()
jazz will remove the perimeter trees and what we get back Wil be an array of just the interior trees coordinates. With this in place, we can start working on our solution to part one:
let baseVisible = (grid.xBounds.count * 2) + (grid.yBounds.count * 2) - 4
return grid
.interiorCoords
.reduce(baseVisible) { accumulator, coords in
let currentHeight = grid.heightAt(coords)
let isHidden = // ????
return accumulator + (isHidden ? 0 : 1)
}
We’ set up baseVisible
using the count of all the trees along the perimeter as they’re already known to be visible. Because the 4 corners are included in both the xBounds and the yBounds ranges, however, we’ll over count the number of trees by 4, so we have to correct that.
Next, we reduce over the array of our interior coordinates, grab the height of the current tree and then decide if the tree is hidden or not. If it’s not hidden, we’ll add it to our accumulator.
Now things get fun. For each tree we need 4 arrays: trees above, below, left and right. Let’s work a little backwards here and start by scaffolding a radiateOutFrom()
which will return these 4 arrays:
func radiateOutFrom(_ coords: Coords) -> [[Coords]] {}
And we can even fill in our // ????
in our solution code too:
let isHidden = grid.radiateOutFrom(coords)
.map { direction in direction.map { otherCoords in grid.heightAt(otherCoords) } }
.map { otherHeights in otherHeights.firstIndex { height in height >= currentHeight } }
.allSatisfy { $0 != nil }
We’ll grab an array of arrays of coordinates, representing the 4 directions, map those coordinates to the height and then look to see if every direction has a tree which meets the requirements of being equal to or greater than the current tree’s height. If the current tree is taller than any of its peers in any direction than our firstIndex(_:)
will return a nil and we’ll fail our allSatisfy(_:)
).
Let us fill in the blanks with this radiateOutFrom(_:)
and start by making a small helper. We want something that we can give a “direction” vector to and it’ll return the list of coordinates, without our origin, till the edge of the map:
func moveAwayFrom(from coords: Coords, inDirection: Coords) -> [Coords] {
var steps: [Coords] = []
var currentStep = coords
var nextStep: Coords = (x: currentStep.x + inDirection.x, y: currentStep.y + inDirection.y)
while contains(nextStep) {
currentStep = nextStep
nextStep = (x: currentStep.x + inDirection.x, y: currentStep.y + inDirection.y)
steps.append(currentStep)
}
return steps
}
You could probably muck with stride()
or zip
here to make this a little more condensed, but the general gist is that we’ll add our direction vector to our coordinates, appending the new set of coordinates to a list for as long as we’re still on the map. Once an edge is hit, we’ll include the edge and then return the full array of coordinates.
With that, we just need to provide a “direction” vector for each of the directions, map over them and return the results:
func radiateOutFrom(_ coords: Coords) -> [[Coords]] {
return [ (0, -1), (0, 1), (-1, 0), (1, 0) ]
.map { direction in moveAwayFrom(from: coords, inDirection: direction) }
}
With that, our solution to part one should be done!
Consider each tree on your map. What is the highest scenic score possible for any tree?
Naturally being well hidden shouldn’t preclude the tree house from having a great view. We’ll have to again iterate through the interior trees and this time, calculate the view score which consists of the distance to the first tree that is of equal or greater height all multiplied together for each direction. After we’ve done this, we’ll need to find the highest-ranking view score.
Our initial setup for the solution starts off the same as before, we iterate over the interior coordinates and then get our list of tree heights in the 4 directions. The only difference is that we’ll take the first index of the tree matching our criteria OR the total number of trees in that direction, ie the count of the directions array:
return grid
.interiorCoords
.map { coords in
let currentHeight = grid.heightAt(coords)
return grid.radiateOutFrom(coords)
.map { direction in direction.map { otherCoords in grid.heightAt(otherCoords) } }
.map { otherHeights in
let index = otherHeights.firstIndex { height in height >= currentHeight }?.advance(by: 1)
return index ?? otherHeights.count
}
.reduce(1, *)
}
.max() ?? 0
There’s one little trick in here, that advance(by: 1)
which is the same as index + 1
but has the advantage of being optionally chainable. We’re doing this because, as we’ve seen the week before, we have to convert our 0-indexed problem space into a 1-indexed solution space for the puzzle to correctly validate.
And that’s it!
There’s some additional clean up that you could do. For example, I consolidated the index/advance/nil-coalescing into my radiateOutFrom
function such that it’s signature looks like:
func radiateOutFrom(_ coords: Coords, tallerThan: TreeHeight) -> [(index: Int, count: Int)]
I’ll leave it as an exercise for the reader to figure out what other changes need to be made for each solution and whether or not this is a cleaner approach.
Until tomorrow!
Previous: Day 07
Welcome back to day number 7 of the 2022 Advent of Code, we’ll have worked our way through a whole week of challenges after finishing today’s puzzle!
Continuing with our theme of trying to write not over engineered, but also not terribly unclear “clever” code, we’ll be parsing the input into an actual tree structure. This’ll also give us a taste of using classes and protocols and give us some practice with working with types!
Parsing today’s input isn’t as funky as day 5 was, but it’s still more involved than previous days where we could get away with a few splits and a map.
Per the usual, let’s build out the base containers for our tree. We’ve got both files and directories to represent and we know that directories have some children and a parent, while files are just a size and pathname. Technically, to solve the problem we only need to store the sizes and could represent this as a single type, but for the sake of making debugging easier, I’ve chosen to split directories and files apart and to store extra information such as the path.
class Directory {
let path: String
var size: Int { 0 } // TODO: Implement this
let parent: Directory?
var children: [Any] = [] // TODO: We'll need to figure out what this is
init(_ path: String, parent: Directory? = nil) {
self.path = path
self.parent = parent
}
}
class File: Node {
let path: String
let size: Int
init(_ path: String, _ size: Int) {
self.path = path
self.size = size
}
}
We have two problems, as our little // TODO
comment’s points out. The first is that we need a way to calculate the size of a directory, and the second is that children
can be both directories and files so how do we make an array that can hold both? We need to know how to store the children before we can worry about finding the size of a directory so let’s focus on that for now.
In order to store both files and directories in children
we’ll need to have a common base that they both implement. We have two options here, we could either use a type union, or we could use a protocol. In swift, the equivalent of a type union is created using an enum with an associated value, like so:
enum Node {
case directory(Directory)
case file(File)
}
var children: [Node] = [
.directory(Directory("a")),
.file(File("b.txt", 14848514))
]
This’ll work dandy, but it duplicates information that is already encoded in the type of object: A directory is a directory and a file is a file.
We can do better with protocols and even gain some functionality while we’re at it. A protocol in swift is typically called an “interface” in other languages. It’s basically a way to tell swift “these two, separate types implement this subset of functionality, so I can use them interchangeably” and it looks a bit like this:
protocol Node {
var path: String { get }
var size: Int { get }
}
// Update these definitions to state that Directory and File implement our new protocol:
class Directory: Node {
var children: [Node] = []
// Same as before
}
class File: Node {
// Same as before
}
// Now we can do this:
var children: [Node] = [
Directory("a"),
File("b.txt", 14848514)
]
That’s not too different from the enum setup above, but now we don’t have to worry about duplicating information that is intrinsic to our system already. Using the protocol also lets us store both directories and files in our children
array but it has an added benefit: we can specify functions and properties that all Node
s should implement and can call them without having to worry about any type casting. For example, to get an Array of the sizes of each child we can just map over them and call the protocols .size
property:
children.map { $1.size }
Now that we’ve got our base containers set up, let’s get into parsing our input into our tree structure. Scanning through our input, we find 4 different formats:
$ cd /
moves us up and down the tree$ ls
marks the start of several lines denoting the current node’s contentsdir a
tells us that there is a directory a
we need to add to our children array14848514 b.txt
tells us that there is a file b.txt
we need to add to our children arrayWe can actually ignore $ ls
lines completely since they’re just a marker in our input saying, “the next lines are a listing for the directory we just moved into.”
We can also ignore the first $ cd /
since it’s telling us that we’re starting at the top, the root of the tree. We’ll take into account when we set up our parser which will remove the need to handle creating a root when we come across $ cd /
, further simplifying the cases we need to deal with.
Swift’s iterator helpers makes it easy to ignore both the $ ls
lines, and our first line ($ cd /
) with dropFirst()
and filter(where:)
. After that we just have to parse each line to build up our tree:
var currentParent = Directory("/")
func parseString(_ input: String) -> Directory {
let root = currentParent
var lines = input
.split(separator: "\n")
.dropFirst()
.filter { $0 != "$ ls" }
.forEach(parseLine)
return root
}
func parseLine(_ line: Substring) {}
We’ll use currentParent
to handle inserting nodes into the correct child array and we’ll use $ cd <path>
to change it. Since we want to operate on the root of the tree once we get to solving the challenge, I’ve kept a reference to the root node for convenience which lets us freely change where currentParent
is pointing at.
With this we’ve narrowed our cases down to three and we can further investigate them for a pattern that’ll make it easy to determine which case each line falls into. If we split each line on spaces, we’ll get the following:
$ cd a
can be split into ["$", "cd", "a"]
dir a
can be split into ["dir", "a"]
14848514 b.txt
can be split into ["14848514", "b.txt"]
In other words our pattern is:
$
it’s a cd command and the third index is our directory to change intodir
it’s a new directory command and the second index is the directory nameThere’s one wrinkle we’ll have to address for cd
commands specifically: $ cd ..
. This means we’ll need to navigate to the current directory’s parent, not a child directory.
func parseLine(_ line: Substring) {
let parts = String(line).split(separator: " ")
switch parts[0] {
case "$":
let dir = String(parts[2])
if dir == ".." {
currentParent = currentParent.parent!
return
}
guard let newParent = currentParent.children.first(where: { $0.path == dir }) as? Directory else {
fatalError("Can't find a directory for path \(dir) in \(currentParent)")
}
currentParent = newParent
case "dir":
let dir = String(parts[1])
let newDirectory = Directory(dir, parent: currentParent)
currentParent.children.append(newDirectory)
default:
let path = String(parts[1])
let size = Int(parts[0]) ?? 0
let newFile = File(path, size)
currentParent.children.append(newFile)
}
}
Here we get our first taste of guard statements this season as well:
guard let newParent = currentParent.children.first(where: { $0.path == dir }) as? Directory else {
fatalError("Can't find a directory for path \(dir) in \(currentParent.path)")
}
This is essentially a smart if
statement that lets swift set the guarantee for any code after the guard
that newParent
will exist and be a Directory
. Typically guard statements are a better way to go than the forced optional-unwrapping and forced casting that we’ve done on previous days but since we suspect that no file will be named the same as a directory and thus causing some issues, we could in theory shorten this to:
let newParent = currentParent.children.first(where: { $0.path == dir })! as! Directory
But those two !
forces make the code a bit uglier and are a smell to me.
There are a few other optional related gotchas: we’re assuming that we’ll never try to navigate to the roots parent, which would be nil and we could in theory get a file of size 0
if the int parsing fails. Both of those are fair assumptions we can make, however, since we know the format “shouldn’t” have either of those issues.
Finally we’ve got our input parsed into a tree structure and we can focus on solving this!
Find all of the directories with a total size of at most 100000. What is the sum of the total sizes of those directories?
In order to solve this, for each directory in our tree we need to get an array consisting of that directory’s size as well as the size of all the child directories. We’ll want to combine all of these into a single array which we can filter down to all sizes equal to or less than 100000 before finally summing them together. In order to do this, we’ll need to finish our calculation for the size of a directory first. Remember how we’ve got a computed property setup in our Directory
?
var size: Int { 0 } // TODO: Implement this
This is where having size
on the protocol, and having all our children using this protocol comes in handy. To get the size of a directory it’s simply a summation of all the sizes of its children:
var size: Int { children.reduce(0) { $0 + $1.size } }
Next up we need to build an array of directory sizes. We’ll use some swift pattern matching, specifically a for in where
statement to iterate through our children array and only pull out the directories. I attached this function as an instance function for a Directory
:
class Directory: Node {
// Existing code ...
func subSizes() -> [Int] {
var sizes: [Int] = [size]
for child in children where child is Directory {
// we can safely force cast this since we filtered
// it down to directories in the where clause above
let child = child as! Directory
sizes.append(contentsOf: child.subSizes())
}
return sizes
}
}
For every directory we’ll take its size and append the sizes, we get back from all of the children directories. For example, if we’ve got a tree that looks like this, where the sizes are in parentheses:
- / (13)
- a/ (2)
- b.txt (2)
- e/ (11)
- f/ (11)
- dodge.coin (6)
- hat.trick (5)
/
and sizes
will be [13]
.a
first which will give us back [2]
since a
only has a single file with size 2
in ita
’s [2]
to our existing [13]
in the root for [13, 2]
e
which takes us down into f
f
we’ll get [11]
e
, we’ll have the equivelent of [11].append(contentsOf: [11])
[13, 2].append(contentsOf: [11, 11])
For a little more of a visual aid, this shows the nesting we’ll see while traversing from the root into f/
:
┌────────────────────────────────────────────────┐
│ ┌─────────────────────────────┐ │
│ │ ┌────────────┐ │ │
│ / - [ 13, 2, │ e/ - [ 11, │ f/ - [11] │ ] │ ] │
│ │ └────────────┘ │ │
│ └─────────────────────────────┘ │
└────────────────────────────────────────────────┘
Since we’re using append(contentsOf:)
, which is implicitly flattening our arrays as we go, our final array that root.subSizes()
returns is:
[13, 2, 11, 11]
From here we can do a filter where the element is less than or equal to 100000 and finally sum it up for our part on solution:
root.subSizes()
.filter { $0 <= 100000 }
.reduce(0, +)
Find the smallest directory that, if deleted, would free up enough space on the file system to run the update. What is the total size of that directory?
We’ve got to first find out the minimum size of directory that we need to delete. We’ll start with finding how much space we have free which is the total space we have on the disk, 70000000
minus the size of our root directory. Then we find the amount of extra space required for the update, ie: the minimum amount of space we need to delete by taking the update size and subtracting the existing free space that we can use.
let totalSpace = 70000000
let usedSpace = root.size
let freeSpace = totalSpace - usedSpace
let requiredSpace = 30000000 - freeSpace
This gives us the number we need to filter our directories down with: any directory size equal to or more than the required space is a candidate for deletion. From that filtered down list of directory sizes, we’ll take the minimum and will have our solution:
root.subSizes()
.filter { $0 >= requiredSpace }
.min() ?? 0
How many characters need to be processed before the first start-of-packet marker is detected?
Today we need to run a sliding window over an array of bytes in order to find a “start-of-packet” marker, or a set of 4 consecutive bytes that are all unique within that window. My original solution used a ring buffer, sometimes also referred to as a circular buffer, which is essentially an array of a fixed length that’ll remove an element from the front when you push onto it, if its length is over the length after the push operation.
We can simplify the process, however, and instead just keep track of the upper and lower-bound indices of our window, taking a slice from the input between those bounds and checking for 4 unique characters
For example, using mjqjpqmgbljsphdztnvjfqwrcgsmlb
we can start off with the first 4 characters:
[mjqj] pqmgbljsphdztnvjfqwrcgsmlb
This isn’t the start-of-packet as there are only 3 unique characters since j
is repeated twice. Sliding our window forward by one:
m [jqjp] qmgbljsphdztnvjfqwrcgsmlb
This is not the packet, so we continue on with sliding the window forward by one, two more iterations:
mj [qjpq] mgbljsphdztnvjfqwrcgsmlb
mjq [jpqm] gbljsphdztnvjfqwrcgsmlb
Finally we’ve got a window where there are 4 distinct characters present, our start-of-message packet! We’ll return the index of the upper bound of the window as our solution, in this case 7.
Now that we’ve got that figured out, we need to get an array of characters out of our input. Thankfully, swift gives us an Array(_ str: String)
initializer:
func parseLine(_ line: Substring) -> [Character] {
return Array(line)
}
And now we just have to create that sliding window. We’ll define the window size:
let windowSize = 4
let adjustedWindowSize = windowSize - 1
We have to make a small adjustment to make the window size usable within our arrays. If we were to do line[0...4]
we’d actually get the first 5 characters instead of the first four that we need to start off with, as a result of the array being 0-indexed but our counting being 1-indexed. As a result we subtract one from our 1-indexed count in order to get a 0-indexed window.
Now we just iterate from our window size up to the line’s length. This’ll give us the upper-bound shifted forward by 1 each iteration, and we can compute the new lower-bound by subtracting our window size to get the slice of 4 characters within those bounds:
for upperBound in adjustedWindowSize..<line.count {
let lowerBound = upperBound - adjustedWindowSize
if Set(line[lowerBound...upperBound]).count == windowSize {
return upperBound + 1
}
}
Finally, we convert the slice into a Set
to get the unique characters and take the count. If it’s 4, we can return our upper bound but we have to remember to convert it back to a 1-indexed bound for the answer!
How many characters need to be processed before the first start-of-message marker is detected?
Now we’re looking for a second packet but the technique is the same, we need a sliding window of 14 characters over the input to find the first instance where the 14 characters are all distinct. Thankfully, since we’ve defined the window size as a standalone variable we can just adjust it from 4 up to 14 and that’s it!
Today’s problem turned out to be more of a parsing problem than a logic problem for me. Last year when doing AoC in OCaml, I wrote my own parser combinator library and I’m heavily considering doing the same in swift just to learn how to better, but even then a parser combinator wouldn’t have helped me nearly as much as I would have liked.
Our input consists of three bits of information:
The first two are separated from the moves via a double line break and thankfully the moves are fairly easy to break away. The stacks, however, are going to take a bit more work:
[D]
[N] [C]
[Z] [M] [P]
1 2 3
One thing to note is that each stack’s columns are 4 characters wide (with the exception of the last which is 3) so we could reuse our Array#chunked()
extension from day 04 to get our stacks broken apart.
0 | 1 | 2 | 3 |
---|---|---|---|
[ | D | ] |
Note that we’ll want to use the safer version that slices to the chunk size OR the string length if it’s smaller to account for the last stack being of length 3 and not 4. Per chunk we can extract the second element to figure out if it’s a stack or empty space, something like this:
let rawStacks = lines.split(separator: "\n")
let stackDefinitions = rawStacks.dropLast()
.map { line in
Array(line).chunked(into: 4).map { $0[1] }
}
.reversed()
There’s a lot going on here, first we don’t care about the last line as it’s just the stack numbers so we call Array#dropLast()
which will give us a collection that, when iterated over, will not include the final line. It’s a cleaner way of doing:
rawStacks[0..<rawStacks.count - 1]
Next, for each line we convert it to an array of String.Element
s aka Character
s and use our chunking function to get each stack broken apart. Finally we map over the array of chunks to give us back an array where each index corresponds to a stack and each element with either be an empty space or a crate letter. Finally, we reverse it which will make the next step of transposing these rows into our initial stacks array a lot easier. After running over our lines, we end up with a 2-d array looking something like this:
[
["Z", "M", "P"],
["N", "C", " "],
[" ", "D", " "]
]
Lastly, before we move onto parsing the moves and solving part one, we need to transpose our stack data such that we end up with an array where each index is a column or stack, as opposed to the current situation that we have, where each index is a row. Our final array that we’ll use for the solutions will look like this:
[
["Z", "N"],
["M", "C", "D"],
["P"]
]
First, we’ll need to make the array representing our stacks that we’re going to transpose into. It’ll be easier if we pre-fill it with empty arrays so that we can just append to the correct stack when we come across a crate, so we can use the Array(repeating:, count:)
initializer and we’ll use the length of our first row as a quick a dirty count for the number of stacks that we have:
let numberOfStacks = stackDefinitions.first!.count
var stacks: [[Character]] = Array(repeating: [], count: numberOfStacks)
If number of crates is 3
for example, this is equivalent to:
var stacks: [[Character]] = [ [], [], [] ]
But it avoids hardcoding the length in, which is helpful when we want this code to run against both the example input and our own input file. Another approach would be to simply map over the first row, returning an empty array:
var stacks: [[Character]] = stackDefinitions.first!.map { _ in [] }
However, I wanted to show off the use of the Array initializer, and I think it’s a littler clearer than the map.
Finally we can transpose our data. For each row we’ll iterate over the elements and use the elements index to look up which stack array we need. We’ll also filter out spaces using swift’s for ... where
syntax:
for stackRow in stackDefinitions {
for (idx, crate) in stackRow.enumerated() where crate != " " {
stacks[idx].append(crate)
}
}
Finally we’ve gotten our stack data parsed out and we’re onto the moves instructions before we solve this. Thankfully parsing the move is easier than the stack definitions.
First we’ll define a little container to make our code a little easier to read:
struct Move {
let numberOfCrates: Int
let fromStackIndex: Int
let toStackIndex: Int
}
Since the move instructions are all in the same fixed format, we can do a little trick rather than reach for something like regex (what I did when I initially solved this):
1> "move 3 from 5 to 2".split(separator: " ").map { String($0) }
$R0: [String] = 6 values {
[0] = "move"
[1] = "3"
[2] = "from"
[3] = "5"
[4] = "to"
[5] = "2"
}
For each line we can split on the spaces and take:
func parseMoveLine(_ line: Substring) -> Move {
let parts = line.split(separator: " ")
return .init(
numberOfCrates: Int(parts[1])!,
fromStackIndex: Int(parts[3])! - 1,
toStackIndex: Int(parts[5])! - 1
)
}
The key part here is to subtract one from the stack numbers as the puzzle uses 1-indexing but our code operates in swift’s 0-indexing system.
After the rearrangement procedure completes, what crate ends up on top of each stack?
At this point we’ve got our stacks, modeled as an [[Character]]
and our move instructions in an [Move]
. For each move, we’ve got an amount of crates to transfer from one stack to another stack and this happens sequentially. For example, the line move 3 from 1 to 3
requires us to pop a crate off of stack number 1 and append it to stack number 3, and we’ll do that three times.
Using the example, we start with the following stacks:
[
["Z", "N"],
["M", "C", "D"],
["P"]
]
After the first instruction move 1 from 2 to 1
We’ll have:
[
["Z", "N", "D"],
["M", "C"],
["P"]
]
The next instruction brings us to this process of popping and appending in a much more noticeable way, though: move 3 from 1 to 3
. After the first pop, we end up with:
[
["Z", "N"],
["M", "C"],
["P", "D"]
]
Notice we didn’t move 3 all at once, this means that our crates that are getting moved around will be getting reversed in order each time multiples are moved per instruction, as see in the second and third crates getting moved by this instruction:
[
[],
["M", "C"],
["P", "D", "N", "Z"]
]
We’ll do this process with the following:
for move in moves {
for _ in 0..<numberOfCrates {
let movingCrate = stacks[move.fromStackIndex].popLast()!
stacks[move.toStackIndex].append(movingCrate)
}
}
Notice that our logic looks pretty much as we described it, the actual solution is fairly simple while the difficulty laid in the parsing for this problem!
After the rearrangement procedure completes, what crate ends up on top of each stack?
Next up we’ve got a twist: we’re going to move all of the crates all at once. Now our second instruction in our example results in this:
[
[],
["M", "C"],
["P", "Z", "N", "D"]
]
Notice how the group of three crates from stack one, Z, N, D
remains in the same order as they’re moved rather than being reversed due to the pop/append process? Instead of popping a single crate off at a time, we’ll just slice off the top using suffix(from:)
to get the crates and removeLast(_: Int)
to remove them from the stack we are moving them from, and append(contentsOf:)
to add them all at once, in the same order that we removed them in, to our stack we are moving to. Writing some pseudo-code would give us something like:
let length = stacks[move.fromStackIndex].count
let slicePoint = length - move.numberOfCrates
let fromStack = stacks[move.fromStackIndex]
stacks[move.toStackIndex] = stacks[move.toStackIndex] + fromStack[slicePoint..<length]
stacks[move.fromStackIndex] = fromStack[0..<slicePoint]
We can make this a little more expressive using the suffix(from:)
, removeLast(_: Int)
and append(contentsOf:)
functions:
for move in input.moves {
let length = stacks[move.fromStackIndex].count
let slicePoint = length - move.numberOfCrates
let movingCrates = stacks[move.fromStackIndex].suffix(from: slicePoint)
stacks[move.fromStackIndex].removeLast(move.numberOfCrates)
stacks[move.toStackIndex].append(contentsOf: movingCrates)
}
Some languages have a “removeAndReturn” method which might reduce the lines here by one, but this isn’t the worst considering half of it is calculating an index to start the suffix from!
I felt that today’s puzzle was rather easy, but I acknowledge that a big part of that is because the swift language and standard library had all of the tools necessary built in to solve the problem with minimal fanfare. I also started solving the second part without knowing it before I finished reading the first part’s challenge, lol.
In how many assignment pairs does one range fully contain the other?
Our input for today maps two elves per line, where each elf is assigned a contiguous range of sections to clean up. We’ve got to find how many of these elves are assigned to clean up sections that are completely assigned to their pair already. An elf assigned to 2-4 in the input is actually assigned to sections 2, 3, and 4 and this is starting to look awfully like the concept of a range of numbers. A lot of us have probably seen the following code in some form before:
for let i in 0..<6 { }
// OR
for let i in 0...5 { }
The ..<
and ...
operators are actually creating a range object in the background: Range
for ..<
which is a half-open range from the lower bound up to but not including the upper-bound and ...
for ClosedRange
which is from the lower bound up to and including the upper bound. For the sake of convenience today, we’ll be using ClosedRange
s. A single section range in the input looks like the following: 2-4
so we’ll split on -
, convert the two parts to Int
s and then map them to a ClosedRange
with ...
:
func sectionToRange(_ sectionString: Substring) -> ClosedRange<Int> {
let parts = sectionString
.split(separator: "-", maxSplits: 1)
.map { Int(String($0))! }
return parts[0]...parts[1]
}
To make things a little easier to understand, as per usual we’ll combine this into a container struct per line. Today’s will hold the two elves zone’s ClosedRange
s and we’ll use our helper from above to build the two ranges:
struct ZonePairs {
let leftZone: ClosedRange<Int>
let rightZone: ClosedRange<Int>
}
func parseLine(_ line: Substring) -> ZonePairs {
let parts = line.split(separator: ",", maxSplits: 1)
return .init(
leftZone: sectionToRange(parts[0]),
rightZone: sectionToRange(parts[1])
)
}
Here’s the neat bit, though: Range
turns out to be incredibly helpful for us because it has contains
which pretty much solve this first part of the challenge. Now that we’ve got our input mapped to an array of ZonePairs
we can filter the array down to pairs where either the left or the right zone fully contain the right or left zone respectively and then simply count the number of zone pairs left:
elfZonePairs
.filter { $0.leftZone.contains($0.rightZone) || $0.rightZone.contains($0.leftZone) }
.count
In how many assignment pairs do the ranges overlap?
This part is actually even easier than the first part. As we’ve just seen, Range
has a lot of provisions already, so we can go looking for something that’ll tell us if one Range
overlaps another Range
and sure enough we’ll come across overlaps
. Now, instead of filtering down to the set of zone pairs that contains the other pair, we’re just filtering them down to the pairs that overlap:
elfZonePairs
.filter { $0.leftZone.overlaps($0.rightZone) }
.count
And that’s it for today!
Updated Dec 12, 2022 to remove shorthand argument names in the last reduce to help clarify what’s going on
Find the item type that appears in both compartments of each rucksack. What is the sum of the priorities of those item types?
So we’ve got an elf’s rucksack per line in our input. Each rucksack has two compartments and there is an item that is present in both compartments that we need to identify. Basically, we need to do an intersection between the two compartments and then convert the character representing the item into a “priority” number.
Unfortunately Swift doesn’t have a built-in intersection for Arrays, but does have intersections for Sets, so let’s parse our input into those. As we did for yesterday, let’s make a little container to hold our rucksack contents to make our code a little easier to read:
struct Rucksack {
let compartmentA: Set<Character>
let compartmentB: Set<Character>
}
As stated above, we’ll benefit from using Sets, so the first part reduces down to something like the following, using our new Rucksack
struct:
let itemInBothCompartments = rucksack.compartmentA.intersection(rucksack.compartmentB)
Before we finish that thought, though, let’s finish parsing an elf’s line. Now that we’ve got our container struct we need to do two things: split a line from our input in half and then convert each half into a Set
of Characters
. Thankfully we can use swifts Array#prefix()
and Array#suffix()
methods to get the first half and the second half of the line in a fairly easy to read way. We can also map over the resulting arrays and initialize a Character
before we initialize our Set
:
func parseLine(_ line: Substring) -> Rucksack {
let halfLength = line.count / 2
let compartmentAArray = line.prefix(halfLength).map(Character.init)
let compartmentBArray = line.suffix(halfLength).map(Character.init)
return .init(
compartmentA: Set(compartmentAArray),
compartmentB: Set(compartmentBArray)
)
}
With this, one last part of the puzzle remains: Once we have the intersection, we have a character that needs to be mapped to a “priority” number using the following rules:
a
through z
maps to 1 - 26A
through Z
maps to 27 - 52If you’re familiar with the ASCII representations for a-z and A-Z you’ll immediately see that even if we take the ASCII number value for our characters, A
- Z
maps to a lower range (65-90) than a
- z
(97-122) and neither of those align with our 1-52 range of values! We’ll have to subtract a fixed value, but we’ll also have to have two different fixed values, depending on if the character is upper-case or lower. Let’s remap A
-Z
first:
func remapCharToPriority(_ char: Character) -> Int {
let rawAsciiValue = Int(char.asciiValue!)
// A-Z have priority of 27 - 52
return rawAsciiValue - 38
}
A few things to note here: Character#asciiValue
returns an optional. We’re going to force unwrap the result since we are trusting that our input falls only within ASCII values. You’d probably want to add some additional sanity checks here for real-world problems but since we know that our input is going to be well formed, we’ll get away with this. Secondly, Character#asciiValue
returns an UInt8
instead of an Int
which could be fine, but we’ll overflow UInt8
, which can only store from 0 to 255, once we start adding together priorities from other elves’ rucksacks. To get around this we convert the UInt8
to an Int
which has a far wider range that it can store (which means we don’t have to worry about this conversion going south at any point too). Finally, we subtract 38 which means that A
will map to 27
(65 - 27 = 38
) and Z
to 52
as we expect.
We’ve got one case to handle here, however: a
which is 97
in ASCII will currently map to 59
which isn’t what we want. We need to add an if branch for when the ASCII value is 97 or higher and return the ASCII value subtracting 96
in order to correctly map the lower-case characters:
func remapCharToPriority(_ char: Character) -> Int {
let rawAsciiValue = Int(char.asciiValue!)
// a-z have priority of 1 - 26
if rawAsciiValue >= 97 {
return rawAsciiValue - 96
}
// A-Z have priority of 27 - 52
return rawAsciiValue - 38
}
With that we’ve got all we need to solve this part of the puzzle:
rucksacks.map { sack in sack.compartmentA.intersection(sack.compartmentB).first! }
.map(remapCharToPriority)
.reduce(0, +)
For each rucksack, we find the item that exists in both compartments. We can force unwrap this because, again, we know that our input will have a duplicate per line but we’d want some better error handling for real-life applications. Then we remap each duplicate item into its priority and finally sum it all together.
Find the item type that corresponds to the badges of each three-Elf group. What is the sum of the priorities of those item types?
Now, instead of finding the duplicated item across a single rucksack’s compartments, we’re looking for a duplicated item across three elfs’ rucksacks. It turns out that we can keep our mapping logic the same, and our only changes will be how we apply intersections across the rucksacks. The first thing we can change is unioning the two compartments of each rucksack together since we don’t care about duplicates for a single elf anymore:
rucksacks.map { sack in sack.compartmentA.union(sack.compartmentB) }
The next thing we need to do is divide the rucksacks into groups of three. Unfortunately swift doesn’t have a built in cons
, pairs
, or slicesOf
function for any data structure, so we’ll have to make our own. We’ll do this using an extension onto Array so let’s write our signature that we’re aiming for first:
extension Array {
func chunked(into size: Int) -> [[Element]] {
return // something ...
}
}
Thankfully the swift standard library includes a neat little stride
function:
func stride<T>(
from start: T,
to end: T,
by stride: T.Stride
) -> StrideTo<T> where T : Strideable
We can use this to produce a sequence of the starting index for each group:
> Array(stride(from: 0, to: 9, by: 3))
$R: [Int] = 3 values {
[0] = 0
[1] = 3
[2] = 6
}
With this we can map over this sequence, and take a slice from the Array self
(since we’re in an extension of Array
) and convert it to a standalone array for convenience in a few minutes with something like the following:
Array(self[$0 ..< ($0 + size)])
Leaving us with the final following implementation:
extension Array {
func chunked(into size: Int) -> [[Element]] {
return stride(from: 0, to: count, by: size).map {
Array(self[$0 ..< $0 + size])
}
}
}
It should be noted that this method will fail with an out-of-bounds error for arrays that are not nicely groupable, so an extra bit of safety would either be to implement that as a check and throw an error if count is not cleanly divisible by 3 or to use something like min($0 + size, count)
to cut the last group into a smaller slice without failing.
With this in place, we can finish up our task as we can now group the elves into sets of 3. We’ll reduce each group, calling Set#intersection
to compute the final intersection of the group to determine what they’ve gotten duplicated amongst themselves. After that, we’ll return to our first solution and map each item to the priority number and finally sum it all together:
rucksacks
.map { sack in sack.compartmentA.union(sack.compartmentB) }
.chunked(into: 3)
.map { chunk in
chunk[1..<chunk.count].reduce(chunk[0], { innerMemo, prioritySet in
innerMemo.intersection(prioritySet)
}).first!
}
.map(remapCharToPriority)
.reduce(0, +)
We’re using a reduce here so that our code is a little more configurable and maintainable, but it boils down to something like:
chunk[0].intersection(chunk[1]).intersection(chunk[2])
And with that our second star is within reach!
As with yesterdays solution I ended up just taking a fairly naive approach here rather than decomposing the problem into the math problem that others have done.
What would your total score be if everything goes exactly according to your strategy guide?
Our input has a round’s strategy per line, where a strategy is the opponent’s move and our move, separated by a space. The opponent’s move is encoded as:
A
RockB
PaperC
ScissorsAnd our move is encoded as:
X
RockY
PaperZ
ScissorsAdditionally, we find out that each move has a score assigned to it:
Finally, we have a set of rules about which move defeats which other move:
So we now know that our problem space is confined to these three moves and their respective rules, each move has a score assigned to it and that our input uses two different characters to represent the same move. We could take this information to make a few functions like the following:
func score(_ char: String) -> Int {
switch char {
case "A", "X": return 1
case "B", "Y": return 2
case "C", "Z": return 3
}
}
func defeats(_ char: String) -> String {
switch char {
case "A": return "Y"
case "B": return "Z"
case "C": return "X"
}
}
But this presents us with a few problems:
"A"
isA good way to work around these problems is to ensure that our code only operates within a confined problem space, letting the language do the work of validating that we stay within the bounds and setting up a boundary between the input and our problem space in the form of a function that’ll map the input. This narrows the place where we worry about the input format down to one space and free up our solution code to be both more expressive and decoupled. To do this we’ll make an enum backed by the scores as integer values:
enum Move: Int {
case rock = 1
case paper = 2
case scissors = 3
}
Using this enum, we can easily map both A
and X
to Move.rock
, so we can make a quick mapping function that’ll take all 6 characters in our input and convert them to our nice enum. This establishes the boundary between the input and our problem space and is the only place we have to worry about the input format. In other words, the decoupling here lets us easy switch out characters and handle adapting to different input formats in the future, leading to more maintainable code.
func mapStringToMove(_ part: Substring) -> Move {
switch part {
case "A", "X": return .rock
case "B", "Y": return .paper
case "C", "Z": return .scissors
default: fatalError("Unrecognized input \(part)!")
}
}
Now that we can map our input down to our problem space, we’ll make a little container that’ll represent a single round and make one last parsing related function that’ll convert a line from our input into a RoundStrategy
. This container isn’t strictly necessary as you could use a tuple, but I find the expressiveness of the struct a lot more maintainable and lends itself to more “self-explaining code”:
struct RoundStrategy {
let theirMove: Move
let myMove: Move
}
func parseLine(_ line: Substring) -> RoundStrategy {
let parts = line.split(separator: " ", maxSplits: 1)
return .init(
theirMove: stringToMove(parts[0]),
myMove: stringToMove(parts[1])
)
}
We’ll add a few helper functions to the RoundStrategy
container in a little bit but for now this will be enough. Now we should be able to map our entire input file into an array of RoundStrategy
s which lets us focus on building out our scoring functionality.
We know that for a single round, if the opponents move is the same as mine, then the round is a draw and the scoring is simply the score for our move plus 3
. Let’s add a score
function to our RoundStrategy
struct and encode this first rule:
struct RoundStrategy {
let theirMove: Move
let myMove: Move
func score() -> Int {
if theirMove == myMove {
return myMove.rawValue + 3
}
}
}
Now we’ve got two other outcomes to consider:
To try and keep the expressiveness we’ve already established, and trying to anticipate any changes we’ll need for part two, we can make another container and a small lookup function to map one move to the move that it’ll defeat. Then we can simply run their move through the lookup helper to get which move it’ll defeat. If that looked up move is ours, we know we’ve lost and otherwise we know we’ve won:
struct CounterMoves {
let losingMove: Move
}
// Rock defeats Scissors, defeated by Paper
// Paper defeats Rock, defeated by Scissors
// Scissors defeats Paper, defeated by Rock
func possibleCountersFor(_ move: Move) -> CounterMoves {
switch move {
case .rock: return .init(losingMove: .scissors)
case .paper: return .init(losingMove: .rock)
case .scissors: return .init(losingMove: .paper)
}
}
Using a struct here means that if we need to, say, encode the move that’ll defeat their move as well as which move is defeated by their move, we can just add another field to the struct without too many code changes.
Using this in practice looks a bit like this:
let myPossibleMoves = possibleCountersFor(theirMove)
if myPossibleMoves.losingMove == myMove {
// I've lost :-(
} else {
// I've won! :-D
}
Let’s add that to our RoundStragety#score()
function:
func score() -> Int {
if theirMove == myMove {
return myMove.rawValue + 3
}
let myPossibleMoves = possibleCountersFor(theirMove)
if myPossibleMoves.losingMove == myMove {
return myMove.rawValue + 0
}
return myMove.rawValue + 6
}
With that we should be able to write some sanity check tests around the scoring functionality for all possible combinations and ensure that it scores correctly. For example, using the puzzles example:
final class day02Tests: XCTestCase {
func testRoundScoring() throws {
XCTAssertEqual(RoundStrategy(theirMove: .rock, myMove: .paper).score(), 8)
XCTAssertEqual(RoundStrategy(theirMove: .paper, myMove: .rock).score(), 1)
XCTAssertEqual(RoundStrategy(theirMove: .scissors, myMove: .scissors).score(), 6)
}
}
With tests written and passing we can tie everything together, parsing our full puzzle input into an array of RoundStragety
s and then simply map them to each round’s score and sum all the scores up. You can do this in one go using a reduce as well:
rounds.reduce(0, { memo, round in memo + round.score() })
Following the Elf’s instructions for the second column, what would your total score be if everything goes exactly according to your strategy guide?
This just in: we were wrong! The second character for each round isn’t our move but the outcome of the round. We’ll have to figure out what move to make based off of our opponents move and the outcome of the round. The outcome is mapped as such:
X
we need to loseY
we need to cause a drawZ
we need to winThere are a couple of different ways to tackle this problem, some of which will be a little more expressive than the approach I’m going to take. We’ve got a problem with our current RoundStrategy
with this twist: the .myMove
is actually the outcome of the game and we have to narrow it down to which move we should actually take. However, after we figure that move out, the scoring stays the same. To make things easier, why don’t we just make a utility that’ll take in an incorrect RoundStrategy
and produce a corrected RoundStrategy
with the correct myMove
? We can start off with the easy case: when the outcome is a draw, or when the incoming myMove
is a .paper
:
// We've got their side and the outcome is under `myMove` because naming is hard
// myMove .rock => lose
// myMove .paper => draw
// myMove .scissors => win
func remapFromOutcomeToMyMove(_ round: RoundStrategy) -> RoundStrategy {
// Draw so myMove is their move
if round.myMove == .paper {
return .init(theirMove: round.theirMove, myMove: round.theirMove)
}
}
From here we can reuse our existing possibleCountersFor()
function to get the case of when the outcome is a loss, or when .myMove
is a .rock
:
let myPossibleMoves = possibleCountersFor(round.theirMove)
// I need to lose, what their move wins against is my move
if round.myMove == .rock {
return .init(theirMove: round.theirMove, myMove: myPossibleMoves.losingMove)
}
To find the correct move for the last case, where we need to win we have a few options but I think it’d be easiest to simply add another field to our CounterMoves
struct, one for the corresponding move that’ll defeat the looked-up move instead:
struct CounterMoves {
let losingMove: Move
let winningMove: Move
}
And now we just need to adjust our look up function to include this winningMove
as well:
// Rock defeats Scissors, defeated by Paper
// Paper defeats Rock, defeated by Scissors
// Scissors defeats Paper, defeated by Rock
func possibleCountersFor(_ move: Move) -> CounterMoves {
switch move {
case .rock: return .init(losingMove: .scissors, winningMove: .paper)
case .paper: return .init(losingMove: .rock, winningMove: .scissors)
case .scissors: return .init(losingMove: .paper, winningMove: .rock)
}
}
And that’s it, the secret sauce which gives us the final case:
let myPossibleMoves = possibleCountersFor(round.theirMove)
// I need to win, what their move loses against is my move
return .init(theirMove: round.theirMove, myMove: myPossibleMoves.winningMove)
Now all we have to do is adjust our reduce call from part one to first remap the struct to get our correct moves in place before calculating the score:
rounds.reduce(0, { memo, round in
memo + RoundStrategy.remapFromOutcomeToMyMove(round).score()
})
And with that, part two is also solved!
Updated Dec 12, 2022 to remove shorthand argument names in the last reduce to help clarify what’s going on
Welcome back to Advent of Code 2022! I haven’t written about my experience using OCaml for last year’s puzzles yet, but I figured I’d try to get a head start on this year while it’s all fresh in my mind. This year I’ll be trying to solve the puzzles using small swift CLI apps and will be trying to do write-ups of my solutions as I go.
For the most part, I’m not going for speed or cleverness so much as expressiveness and maintainability. I like to try and focus on learning patterns that lend themselves to understanding the code quicker 7 months later and to think about what adding additional features or changing requirements on the code could mean. I’m also not going to be focusing on the superfluous and boilerplate code that wraps and integrates my solutions into a CLI and I’m assuming that you the reader has enough general knowledge to do tasks like reading and splitting an input file by newlines and familiarity with iterators and map/reduce functions.
Since this is the first day, however, let’s take a look at how I’ve got this all set up just for reference. Each day I’ll scaffold a new CLI app using the swift package manager:
swift package init --type executable
Then I’ll add in the Swift Argument Parser package. I’ll use a slightly modified Package.swift
as well which I can copy-paste to the next day to hit the ground running without needing to worry about changing anything for each day’s different name:
// swift-tools-version: 5.7
import PackageDescription
import Foundation
// Turns the directory "AOC/2022/day04" into just "day04" for example
let dayName = (FileManager().currentDirectoryPath as NSString).lastPathComponent
let package = Package(
name: dayName,
platforms: [.macOS(.v13)],
dependencies: [
.package(url: "https://github.com/apple/swift-argument-parser", from: "1.2.0")
],
targets: [
.executableTarget(
name: dayName,
dependencies: [.product(name: "ArgumentParser", package: "swift-argument-parser")]),
.testTarget(
name: "\(dayName)Tests",
dependencies: [.target(name: dayName)]),
]
)
And finally I’ll use a boilerplate for the command under Sources/dayXX/dayXX.swift
that looks a bit like this:
import Foundation
import OSLog
import ArgumentParser
let dayName = (FileManager().currentDirectoryPath as NSString).lastPathComponent
let dayNumber = Int(dayName.components(separatedBy: CharacterSet.decimalDigits.inverted).joined()) ?? 0
extension Logger {
static let parsing = Logger(subsystem: "com.aoc22.\(dayName)", category: "Parsing")
static let solution = Logger(subsystem: "com.aoc22.\(dayName)", category: "Solution")
}
@main
public struct Challenge: ParsableCommand {
public static var configuration = CommandConfiguration(
abstract: "Day \(dayNumber)!",
version: "1.0.0",
subcommands: [PartOne.self, PartTwo.self]
)
public init() {}
}
struct BaseOptions: ParsableArguments {
@Argument(help: "The file to work upon for the puzzle input")
var inputFile: String = "input"
}
extension Challenge {
struct PartOne: ParsableCommand {
static var configuration = CommandConfiguration(
abstract: ""
)
@OptionGroup var options: BaseOptions
mutating func run() {
let parsedInput = Parser().parseFile(options.inputFile)
let solution = solve(parsedInput)
print("\(solution)")
}
func solve(_ input: [ParsedLine]) -> Int {
return 0
}
}
struct PartTwo: ParsableCommand {
static var configuration = CommandConfiguration(
abstract: ""
)
@OptionGroup var options: BaseOptions
mutating func run() {
let parsedInput = Parser().parseFile(options.inputFile)
let solution = solve(parsedInput)
print("\(solution)")
}
func solve(_ input: [ParsedLine]) -> Int {
return 0
}
}
}
typealias ParsedLine = String// TODO: Fill me in
struct Parser {
fileprivate func parseLine(_ line: Substring) -> ParsedLine {
// TODO: Fill me in
return String(line)
}
public func parseString(_ input: String) -> [ParsedLine] {
return input
.split(separator: "\n")
.map(parseLine)
}
public func parseFile(_ filename: String) -> [ParsedLine] {
let url = URL(fileURLWithPath: filename)
guard let contents = try? String(contentsOf: url, encoding: .utf8) else {
fatalError("Couldn't parse the file!")
}
return parseString(contents)
}
}
This gives me a quick and ready structure, leaving me with the details of how a line from the input is parsed and what that resulting container looks like, letting me focus on writing a solution by filling in parseLine()
and the two solve()
s without fussing with the setup. I’ve got a few other patterns setup in here too, such as the input always being under at ./input
and some logging for debugging purposes, which I found to be extremely helpful last year. I’ve gone a bit further too and have a small CLI that downloads the days input automatically: aoc-utils download
after a puzzle is released and ./input
is set up and ready to go as well!
The last part to all of this is a set of tests. I like to start off with tests against the example input and the known solution to those samples as well as tests against my final solution so that I can refactor my code and ensure the solution stays the same.
import XCTest
@testable import dayXX
let testInput = """
"""
final class dayXXTests: XCTestCase {
func testPartOneExample() throws {
let parsedOutput = Parser().parseString(testInput)
let solution = Challenge.PartOne().solve(parsedOutput)
XCTAssertEqual(solution, 1)
}
func testPartTwoExample() throws {
let parsedOutput = Parser().parseString(testInput)
let solution = Challenge.PartTwo().solve(parsedOutput)
XCTAssertEqual(solution, 2)
}
func testPartOneRealInput() throws {
let parsedOutput = Parser().parseFile("input")
let solution = Challenge.PartOne().solve(parsedOutput)
XCTAssertEqual(solution, 3)
}
func testPartTwoRealInput() throws {
let parsedOutput = Parser().parseFile("input")
let solution = Challenge.PartTwo().solve(parsedOutput)
XCTAssertEqual(solution, 4)
}
}
Now, once everything is in place and I’ve got a solution setup I can run swift test
and make sure my solution is correct, and swift run dayXX part-one
/ swift run dayXX part-two
to get my solution to put in on the site.
With that all in place, let’s dive into the first puzzle which’ll give us a nice warm up for the season!
Find the Elf carrying the most Calories. How many total Calories are that Elf carrying?
We’ll take a fairly common and slightly naive approach today. There is a way to solve this without building an array of every elf’s calories, instead you just keep track of the highest seen calorie count and the calorie count for the current elf, but that “clever” solution isn’t what I’m after and doesn’t lend itself to showing off some of the language features around iterators.
Looking at our input, we can see each elf’s calorie list is separated by a blank line, and each elf has one or more lines of integer numbers that’ll we will need to sum up in order to find that elf’s total number of calories carried. We can start by splitting the input into an array of strings
In Swift’s type annotations: [String]
, although in reality what we’ll get is actually a [Substring]
where Substring
is actually a reference to the slice of our original string which contains our split out components. A Substring
is intended to be short-lived, so we normally wouldn’t want to pass it around without copying the contents to a separate String
however today we’ll be fairly quickly converting the Substring
into an Int
so it shouldn’t matter too much.
. From there we should be able to iterate over this array, and split each string into even smaller strings representing each item’s calories. From there it’ll be a matter of converting the stringified numbers to Swift Int
s and summing them up.
Assuming input
is our string representing our puzzle’s … well, input, we can use the split(separator:)
function to split on two newlines (\n\n
):
input.split(separator: "\n\n")
Now that we’ve got each elf’s calories separated out we can focus on a single elf at a time. Again we’ll need to split, but only on a single new line this time, and then we’ll convert each element in that split to an integer and sum them up. Swift’s iterators make this fairly easy to do in one go using reduce(_:_:)
:
func parseElf(_ rawLinesOfCalories: Substring) -> Int {
return rawLinesOfCalories
.split(separator: "\n")
.reduce(0) { memo, caloriesLine in memo + (Int(caloriesLine) ?? 0) }
}
The biggest thing with this process is that parsing our string into an integer with Int(_: String) -> Int?
returns an Optional. We could, for the sake of this challenge since we know the input is well formed, force unwrap it with Int(caloriesLine)!
but we could also provide a fallback just in case, using the nil-coalescing operator ??
. Note that we’re putting this parsing into a separate function as it’ll make the next bit a little easier.
Next, we can map over our split up input, calling this new paseElf(_:)
function and have an array that’ll give us the answer to both parts. I’m going to go a step further and shove them into a small container to make debugging easier and to get our first taste of typealias
:
typealias ElfToCalories = (elf: Int, calories: Int)
func parseString(_ input: String) -> [ElfToCalories] {
return input.split(separator: "\n\n")
.map(parseElf)
.enumerated()
.map { (index, calories) in
let elfsTuple = (elf: index + 1, calories: calories)
Logger.parsing.debug("Elf \(elfsTuple.elf): \(elfsTuple.calories)")
return elfsTuple
}
}
Breaking this down a little bit, we can see that we’re defining a typealias
for a named-element tuple containing the elf’s number in our input (we’ll 1-index this to make it easier to debug against the problems example) and their calories. Next we do our existing split on the double new lines and we map each element into an integer. At the point that we call .enumerated()
, we’ll have an array of integers ([Int]
). .enumerated()
is the magic that lets us get the elf’s index within the array, it transforms our array of integers into an array of tuples, where the first element of each tuple is the index and the second is the original value:
let elfCalories = [50, 42, 38, 9]
elfCalories.enumerated() // Equivalent to: [(0, 50), (1, 42), (2, 38), (3, 9)]
Finally we map over this one last time to convert our 0-indexed into 1-indexing and our ElfToCalories
tuple and to log out some helpful messages. Finally we’ve gotten our input parsed into a helpful data structure and we’re able to get on with the challenge. We need to find the elf that is carrying the most amount of calories, which we can do using max(by:)
. This returns an optional but we know that we’ll have a max so we’ll take the shortcut and force unwrap it. Since we’re working with our named-element tuple, we can pull out the calories to get our solution:
func solve(_ input: [ElfToCalories]) -> Int {
return input
.max { a, b in a.calories < b.calories }!
.calories
}
Find the top three Elves carrying the most Calories. How many Calories are those Elves carrying in total?
We can stick with the same parsing for part one but instead of using max(by:)
, we’ll have to find three elves and add their calories together. Thankfully Swift has sorted(by:)
and prefix(_:)
which we can use to first sort our array so that the highest calorie elves are at the front, and then we can take the first 3 elves. From there we can use reduce(_:_:)
again to sum up their combined calories for our solution!
func solve(_ input: [ElfToCalories]) -> Int {
return input
.sorted { a, b in a.calories > b.calories }
.prefix(3)
.reduce(0) { memo, elf in memo + elf.calories }
}
And that’s it, we’ve survived day 1, see you tomorrow!
Next: Day 02